Practical Knowledge from Longsun Green – Your Solar Mounting Structure Specialist
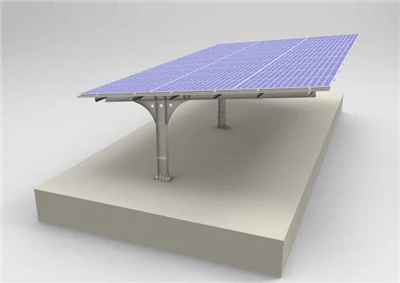
Installing solar panels on a roof requires more than just assembling brackets and rails. Among the various solutions available, the Triangle Mounting System has gained recognition for its adaptability on both flat and sloping metal roofs. However, even with a well-designed system, improper installation techniques can lead to performance issues or material damage. In this article, Longsun Green shares practical tips to help you install smoothly and avoid common pitfalls.
Step-by-Step Overview for Triangle Mounting System Installation
1. Prepare the Concrete Base Foundations
Begin by marking the positions of your precast concrete bases according to the construction drawings. All bases must be aligned horizontally and vertically. Embed anchor bolts with a spacing of 80±0.5mm to ensure a secure foundation for the entire structure.
2. Attach the Adjustable Legs
Fix the front and rear adjustable legs onto the concrete base using M8 nuts. Make sure every leg is tightened firmly, as this directly affects the stability of the whole racking system.
3. Install the Support Rails
If a single rail is too short for your array length, connect multiple rails using rail splices. Insert one end of the splice halfway into the first rail, secure it with an M8x12 hex bolt, then slide the second rail onto the remaining half. For standard lengths that fit, you can skip this step and proceed directly to securing the rails to the adjustable legs with bolts and Z-nuts.

4. Mount the Solar Panels
Start from the bottom left side of the installation area. Each mid clamp must include one grounding washer. For every array or line, equip the two end clamps with two grounding lugs to ensure proper electrical grounding.
Critical Note: Preventing Stainless Steel Fastener "Lock-Up"
One of the most overlooked issues during solar mounting installation is fastener lock-up (also known as "dead lock") with stainless steel bolts and nuts. Unlike carbon steel, stainless steel has excellent ductility but is prone to galling. If improperly handled, the bolt and nut may seize and become impossible to unscrew.
Why does lock-up happen?
When stainless steel threads slide against each other under pressure, friction can generate heat and cause the material to adhere. This is especially common when using electric tools or applying uneven force.
How to prevent it – Practical methods from Longsun Green:
Reduce friction on the threads
Keep thread surfaces clean and free of dust or debris before installation.
Apply a lubricant such as water wax, butter, or 40# machine oil to the threads.
Use correct handling techniques
Keep the bolt perpendicular to the thread axis while screwing. Do not tilt the bolt.
Apply force evenly. Do not exceed the recommended torque value.
Prefer a torque wrench or socket wrench. Avoid using monkey wrenches or high-speed electric wrenches.
If an electric wrench is necessary, set it to the lowest rotational speed.
Avoid overheating
High-speed rotation (common with electric wrenches) rapidly raises temperature and increases the risk of lock-up. Slower rotation is safer.
Final Recommendation
Always follow your project's construction drawings for dimensions and installation details. The guidance above is for general educational purposes. By understanding both the assembly steps and the material behavior of stainless steel fasteners, you can significantly reduce on-site delays and avoid damaging expensive components.

At Longsun Green, we design our solar mounting systems with installer-friendly features, including pre-assembled triangular legs, corrosion-resistant materials, and clear installation logic. Whether you are working on a flat concrete roof or a metal sheet roof, a properly installed Triangle Mounting System will deliver long-term stability and safety.